gluten-free apple cider donuts with beet sugar glaze

1 Comment

gluten-free apple cider donuts with beet sugar glaze

image.jpg

I have an ongoing love affair with apples and one of the best places to find them in New York City this time of year is Migliorelli. This family-run, fruit and vegetable farm originates from 1933 in the Hudon Valley.  They specialize in over 130 different varieties of fruits and vegetables and sell in every major farmers market in New York City. Migliorelli's philosophy is to only sell produce that is less than 24 hours young.

"An Apple a day” is not an old wive’s tale. Apples are a great source for antioxidants, vitamin C and fiber helping you boost immunity and overall health. I like to use applesauce in baking to reduce the amount of oil and butter I use.  This gluten-free apple cider recipe uses apple sauce to increase the fiber content and beet juice to create the perfect shade of pink frosting.

This donut recipe was developed for The Chalkboard Magazine, one of my favorite lifestyle and wellness blogs. 

________________

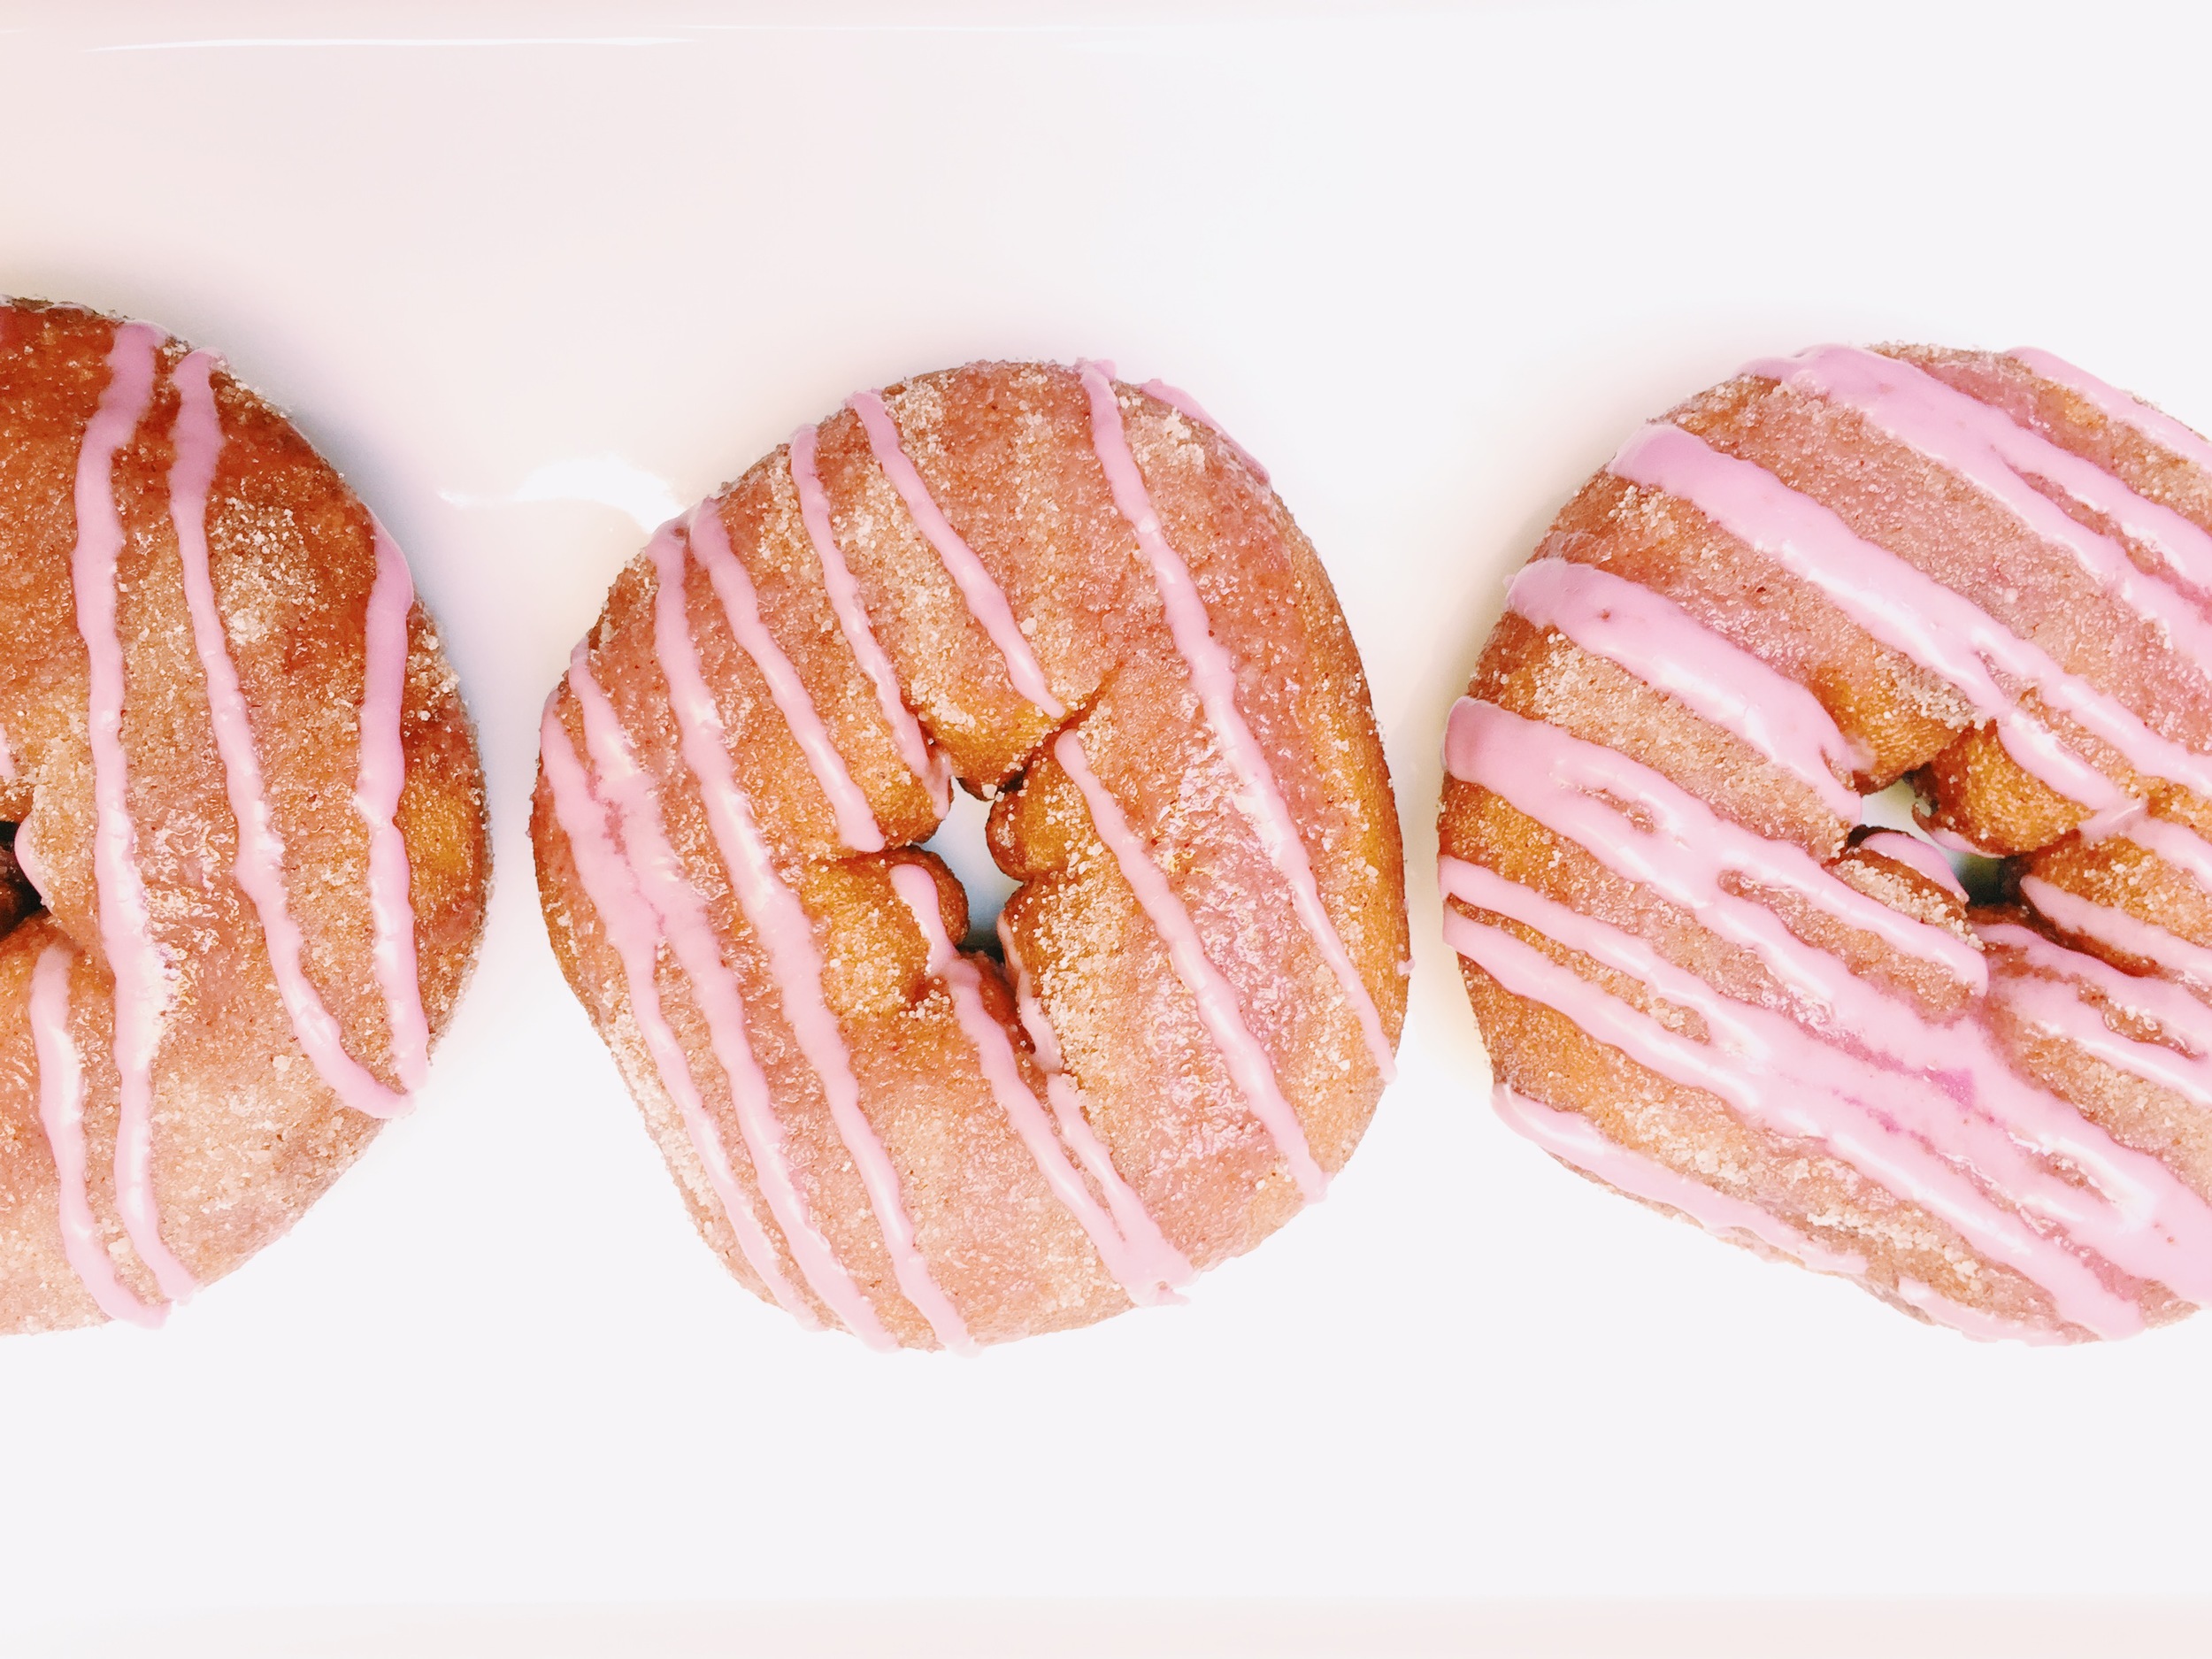
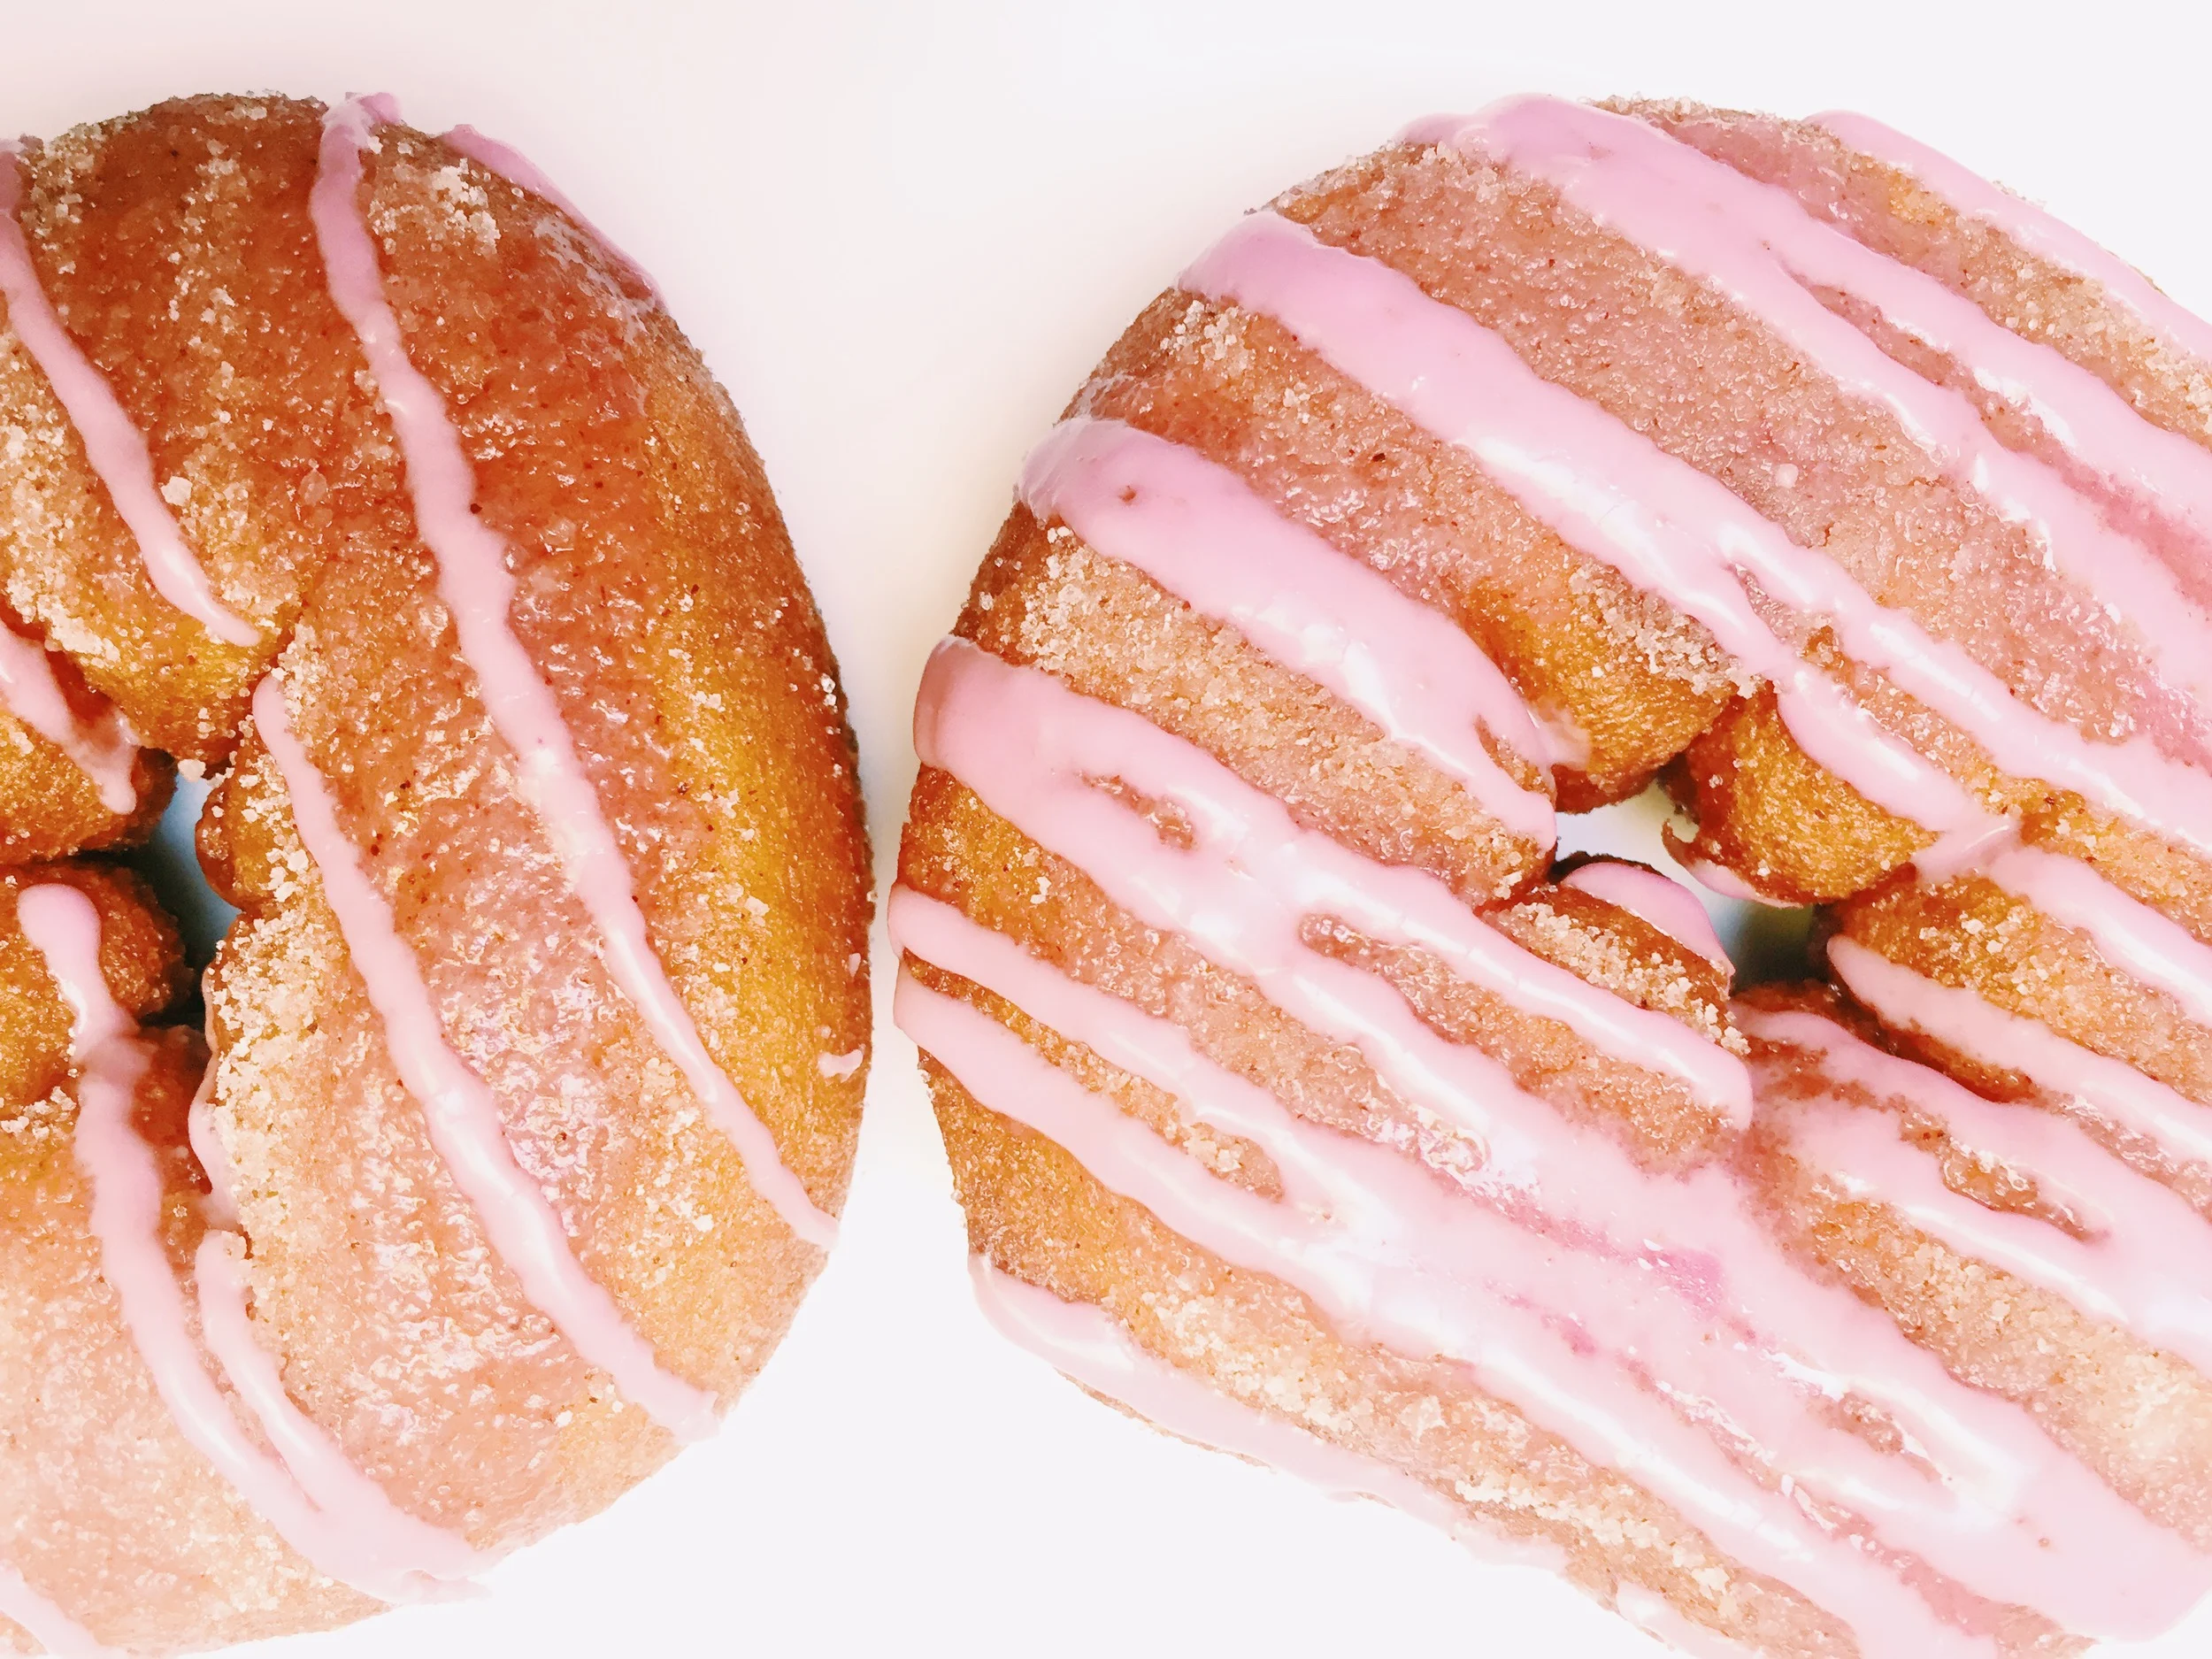
GLUTEN-FREE APPLE CIDER DONUTS WITH BEET SUGAR GLAZE  // serves 12

by Elisabeth Srur

prep time: 20 minutes // cook time: 15 minutes // TOTAL TIME: 35 minutes


DONUT INGREDIENTS:

  • 1/2 cup almond flour

  • 1 1/4 cup gluten-free flour

  • 2 tsp. baking powder

  • 1/2 tsp. baking soda

  • 1/2 tsp. xantham gum

  • 1/2 tsp. cinnamon

  • 1/2 cup unsalted butter, softened

  • 1/2 cup coconut sugar

  • 2 large eggs

  • 1/2 cup apple sauce

  • 1/2 cup mashed banana

  • 1/4 cups apple cider

  • coconut oil spray

DONUT METHOD:

  1. Preheat oven to 400 degrees.

  2. In a large mixing bowl whisk together gluten-free flour, almond flour baking powder, baking soda, xantham gum, salt and cinnamon.

  3. In a separate large mixing bowl, use a hand or stand mixer to whip together butter and coconut sugar until cream and fluffy.

  4. Mix in eggs one at a time into the butter mixture, until well combined.

  5. Add banana, apple sauce and apple cider to the butter mixture, mixing until well combined. 

  6. Slowly add the dry ingredients to the butter mixture until well blended.

  7. Pour the batter into a gallon-size, freezer bag.

  8. Snip of a small corner of the freezer bag, creating a piping bag that will help you easily squeeze the batter into a donut pan. 

  9. Generously spray your donut pan with coconut oil.

  10. Fill each donut 3/4 of the way to the top.

  11. Bake for about 18 minutes or until a knife or toothpick inserted comes out clean. ( note - timing will depend on the size of your donut pan )

  12. Allow the donuts to cool slightly before you add the topping.

TOPPING INGREDIENTS:

  • 1/2 cup granulated sugar

  • 1/2 cup coconut sugar 

  • 1 tsp. ground cinnamon

  • 1/2 cup powdered sugar

  • 1 tsp. beet juice or pomegranate juice

  • optional - 1 tsp. beet juice or pomegranate juice

  • 1 tsp. water

TOPPING METHOD:

  1. Mix the granulated sugar, coconut sugar and cinnamon.

  2. Place the sugar mixture on a plate and roll the donuts in the sugar mixture until well coated. Set aside.

  3. Whisk the beet juice, water and powdered sugar until smooth forming a thick glaze. Set aside.

  4. OPTIONAL - Take 2 tbsp. of the pink powdered sugar glaze and water in down with an additional tsp. of beet juice.  You can put this brighter pink watery glaze on the donuts first if you would like 2 pink colors to show up. Using a spoon, drip the glaze over the donuts in a zig zag pattern. Note that the watery glaze will be mostly soaked up by the donuts.

  5. Take the pink powdered sugar glaze and place in a quart size ziploc bag.  

  6. Snip a tiny corner off of the ziploc bag and pipe the sugar glaze in a stripe patter on the donuts. 

brunchpants_beetdonuts


1 Comment

how to NOT have a to do list

1 Comment

how to NOT have a to do list

November 15, 2023

by Elisabeth Srur

"TO-DO" lists used to haunt my dreams.  I would always feel this constant nagging to cross just one more thing off my list in the hopes that I would reach a place of calm, serene, satisfying accomplishment.  

It. never. happened.

I now use a few different tools that not only replace this old archaic system, but makes me more efficient and proactive. The basic concept is to eliminate your "TO-DO" list entirely by using your email inbox as a daily guide for reminders and actions. By using this system, I now have a clear understanding of what I need to do each day with the simulltaneous goal of getting to “INBOX zero”. Trying to prioritize what to do next, when you are already overwhelmed with a million tasks, is not a good strategy. 

There are a few things you have to do in order to start using this process. (OK, I am lying....it is a little more than a few things...)  It will take you some time to set up, but in the long run, it is worth it!

STEP 1: EMAIL OVERHAUL

  • Make sure you have separate e-mailboxes for work, personal and subscriptions 

    • Note - setting up a separate email for shopping and subscriptions saves time by allowing you to control distractions ( i.e. spam and shoe shopping ) from clogging up your personal and work e-mailboxes. You can comfortably navigate through your day, not checking your subscription inbox, unless you have time. I use my subscription email to sign up for blogs, newsletters, e-commerce stores etc. -- Anything that is not specifically personal or work related. Additionally, if you ever find yourself with a mountain of online shopping returns, you can easily delegate the laborious task of finding the receipts and creating returns to someone else without the invasion of privacy if you gave someone your personal email log in instructions.

    • Sometimes, signing up for specific newsletters or websites is impossible to avoid.  It's even harder to avoid distraction by these emails during your work day.  In this case, set up a smart mailbox through MacMail that filters out anything with the word  "unsubscribe." Or, use the feature on gmail that sorts your emails by PRIMARY, PROMOTIONS, SOCIAL AND UPDATES - (directions here)

  • Unsubscribe from anything you don't read, don't want or don't care about etc.

    • Use a tool like Unroll.me that helps make the process of unsubscribing easier and more efficient. This tool can even combine certain subscriptions into one email summary. 

STEP 2: SET UP EMAIL REMINDERS FOR LATER DATES - 3 OPTIONS

  • Use an email inbox like Superhuman

  • Use the “Snooze” feature on gmail

  • Use a service like, followupthen.com which is an email reminder tool that I didn't even realize I needed until I started using it. You can use it to send yourself reminders, follow up with someone and -- most importantly-- schedule your "TO-DO" items. 

    • by scheduling your "TO-DO" items, you are forced to prioritize when a new task is added to your list. It allows you to effectively separate urgent, non-urgent and important reminders effectively.  A calendar-based scheduling system, does not work nearly as well because you end up wasting time re-scheduling the task on the calendar -- or worse -- missing it entirely. With followupthen.com if you don't have time to complete the task on that day, you can hit one of the convenient "snooze buttons" in the reminder email.

    • Once your email(s) address is registered with followupthen.com, you schedule your emails by sending it to "(day)@followupthen.com"  For example, if I have a task that I need to finish on Friday, I would email Friday@followupthen.com and I would get an email Friday. You can set up times, dates and even recurring reminders.  You can find a detailed list of how to use this service here

    • Some of the ways I use followupthen include:

      • sending myself boarding passes or flight info a few hours before my flight

      • setting up monthly recurring reminders to stay on top of financial work

      • BCCing followupthen when I am emailing a lead and want to make sure I email them again in a month. 

      • automatically resending an email to someone (or myself!) if they don't respond within a few days

STEP 3: ADOPT NEW EMAIL HABITS

  • Your inbox should ONLY contain actionable emails in it that you can respond to or do within that day

    • When you get a new email, it needs to be deleted, archived/filed, scheduled for the appropriate day (through a tool like followupthen or superhuman ) or kept in your inbox to complete THAT DAY.

    • Adopting this practice allows your inbox to stay focused on your daily priorities.

STEP 4: IDONETHIS.COM (optional, but recommended) 

  • If you are like me, crossing something off your "TO-DO" list is rewarding, even if only for a few seconds. (remember, it is the small joys in life that count here, people!) By adopting this new system, you won't have a list to cross off, however you can still get the same joy by using a tool called idonethis.com. This is also a free tool that tracks your "DONE" list instead of your "TO-DO" list.  

  • Every day, you'll get an email asking you what you did that day, along with a list of the previous days accomplishments.  It takes about 30 seconds to complete this email, over time you'll get to see how much you are accomplishing. The tasks are searchable if you ever need to lookup when you did a particular task.

SIDE NOTE: Given all of the above, sometimes there is a need for a list.  Grocery shopping or short-term reminders don't need a complicated system. I call these types of lists "temporary lists." For this, I use microsoft TO DO or Iphone Notes, both can also be shared easily with friends and family.

I hope this system improves your daily routine as much as it has improved mine. Looking forward to hearing any feedback.

1 Comment

overnight steel cut oats

Comment

overnight steel cut oats

brunchpants_overnightsteelcutoats

I ALWAYS need quick breakfast options in the am.  This recipe is so easy and a wonderful thing to wake up to! My friend Stella recently introduced me to this delicious breakfast and I am addicted.

________________

EASY OVERNIGHT STEEL CUT OATS  // makes 4

by Elisabeth Srur

prep time: 10 minutes // cook time: 15 minutes // TOTAL TIME: 35 minutes


INGREDIENTS:

  • 1 cup steel cut oats

  • 4 cups filtered water ( filtered water prevents a film from forming ) 

  • 1/4 tsp. sea salt

  • 1/4 cup frozen or fresh strawberries ( blueberries or raspberries also work ) 

  • 1 cup fresh fruit for topping

METHOD:

  1. In a medium saucepan, bring water to a rapid boil.

  2. Pour in the oats and salt.

  3. Stir and let boil for 1 minute.

  4. Turn off the heat, cover and let stand overnight.

  5. The next morning, on medium heat, stir the oats until heated through.

  6. Add fruit and serve! ( store in a sealed container in the fridge for up to a week ) 

Comment

roasted garlic butter tomato toast

1 Comment

roasted garlic butter tomato toast

IMG_2374.jpg
IMG_5223.jpg

Dairy is an ingredient I love to indulge in, but when I do, I always source from dairy farms with responsible farming practices. Ronnybrook, in New York’s Hudson Valley, is one of those farms. This farm goes above and beyond traditional organic farming methods, never using any pesticides or RBST and making sure their cows get daily access to outdoor exercise. Ronnybrook treats their cows like family and they even have comfort cow stalls with individual mattresses. All of their milk is tested daily to insure that their products meet the highest quality standards.

One of my favorite summertime recipes is roasted garlic tomato toast using Ronnybrook’s European-style unsalted butter. This is my butter of choice because it is fresh churned in small batches and has a higher butterfat content than traditional butters. I usually double this roasted garlic butter recipe and freeze half so it is ready to go for unexpected summer dinner parties.

You can find Ronnybrook at farmers markets all over New York City. They are at the Union Square Farmers Market on Wednesdays and Saturdays.

This recipe was developed for The Chalkboard Magazine, one of my favorite lifestyle and wellness blogs. 

________________

ROASTED GARLIC BUTTER TOMATO TOAST // serves 10

by Elisabeth Srur

prep time: 20 minutes // cook time: 40 minutes // TOTAL TIME: 60 minutes


INGREDIENTS:

  • 8 oz. ( 2 sticks ) of unsalted butter, room temp.

  • 2 heads of garlic

  • 2 French baguettes

  • 4 large heirloom tomatoes

  • 1/2 cup fresh basil

  • 4 tbsp. extra-virgin olive oil

  • flakey sea salt

  • pepper to taste

METHOD:

  1. Take your butter out of the fridge so it can warm up to room temperature.

  2. Preheat oven to 375 degrees.

  3. Cut the top off of the garlic heads ( about 1/4" of the way down ) to expose the cloves.

  4. Drizzle 1 tbsp. of olive oil on top of each garlic.

  5. Wrap each garlic in tin foil.

  6. Roast the garlic for 20 - 30 min. each or until a knife comes out easily when inserted in the center. 

  7. Allow the garlic to cool about 20 min. ( important so you don't melt the butter too much when you mix it in ) 

  8. Once the garlic is cooled, squeeze out the softened garlic cloves and mix into your softened butter.

  9. Cut the baguettes in half lengthwise.

  10. Generously coat both sides of the baguette with your garlic butter mixture.

  11. Wrap the baguettes in 2 sheets of tin foil and toast in your oven or on your grill for 5 -10 minutes per side or until the outside is toasted. Turn your bread once to make sure it doesn’t burn.

  12. While the bread is toasting, slice your tomatoes and roughly chop the basil.

  13. Cut the toasted baguette into serving sizes and lay out on a cutting board or tray.

  14. Sprinkle the salt on top of the bread and then layer the tomatoes on top.

  15. Drizzle the olive oil and another light layer of salt and pepper on top of the tomatoes.

  16. Top with the chopped basil.

  17. Serve while still warm.

1 Comment

downtown santa monica

1 Comment

downtown santa monica

As a new mom and recent Los Angeles transplant, I seek out stroller friendly areas where I can spend the day and explore. A walkable, beachside pocket of LA, Santa Monica is home to countless restaurants, stunning views of the Pacific and activities for every age group. This itinerary below is from a recent day trip with my toddler and covers a few favorite spots.

____________

SANTA MONICA, CALIFORNIA


9:30 am — FARMER’S MARKET // If you are lucky enough to visit Santa Monica on a Wednesday or Saturday, start your day at the crown jewel of West Coast green markets. The Santa Monica Farmer’s market on Fourth Street and Ocean, has the biggest assortment of certified-organic growers in LA. This is a great place to load up on snacks for the day and local produce from California’s farmers. We picked up lemon flavored vegan donuts and coffee as we walked around. Open Wednesdays 8:30 am to 1:30 pm and Saturdays 8:00 am to 1:00 pm.


10:30 am — PIER AND BEACH WALK // Walk down Arizona towards the Ocean and make a right at the Palisades Park towards the Santa Monica Pier.  No visit to Santa Monica is complete without experiencing this Pier.  Check out the The Pacific Park amusement park, home to the famous solar-powered ferris wheel and take in panoramic seaside views.  Before heading in for lunch, put your feet in the sand, using the convenient stroller friendly paved walkways near the entrance of the pier. www.pacpark.com 200 Santa Monica Pier, Santa Monica, CA 90401


12:00 pm —  LUNCH AT FLOWER CHILD // From the Pier, walk up Colorado Avenue and left on Second Street to Flower Child.  This restaurant has a healthy kids menu, changing tables in the bathroom and crayon buckets to entertain the little ones. Parents will be taken care of too with matcha green lattes and build-your-own grain bowls. www.iamaflowerchild.com 1332 2nd St, Santa Monica, CA 90401 (310) 382-2901


1:00 PM —  THIRD STREET PROMENADE // Continue on Second Street towards Arizona, make a right on Arizona and left on Third Street.  Spanning three avenues from Wilshire to Broadway, Third Street Promenade is a walkable open air shopping area.  Dinosaur fountains mark the entrances and at the south end of the promenade you will find Santa Monica Place, with Samo's kids club and play area on the third floor. I usually plan on walking the Promenade around my baby’s nap time so I can sneak in a little shopping. www.downtownsm.com 1351 3rd Street Promenade, Santa Monica, CA 90401


3:00 PM — COLOR ME MINE //  Located a short walk from the Promenade on Fourth Street between Arizona and Santa Monica Boulevard, this paint your own pottery studio caters to all ages.  Color Me Mine is the perfect place to hand-make family memorabilia while occupying the kids for a few hours. You can bring your infants to make hand or footprints while toddlers can “hand paint” plates and mugs. The studio has infinite choices of ceramics to choose from and its a wonderful way to spend a few hours. They will glaze and fire your masterpieces which will be ready for pick up in less than two weeks. Don’t worry if you are just visiting LA, they will ship for you. We made Grandpa a birthday gift and were particularly grateful that they took care of sending it! www.colormemine.com 1335 4th St, Santa Monica, CA 90401 tel. (310) 393-0069 


5:00 PM — SUNSET SUSHI // Walk south on Fourth Street and down Santa Monica Boulevard towards the Ocean. Finish your day and catch the sunset picking up Sugarfish to-go on Second Street on your way to the water. Just make sure to call 45 minutes in advance for your take-out order.  Sugarfish sushi has a West Coast cult following for a reason.  They will prepare their famous “trust-me” order to-go in the most beautiful takeout box you have ever seen. No detail is left out, the order is complete with chopsticks, hand wipes and visual instructions on how to replicate their addicting sushi experience on your own.  This is my secret to an epic early dinner complete with beach front views. www.sugarfishsushi.com 1345 2nd St, Santa Monica, CA 90401 tel. (310) 393-3338


For more ideas and a schedule of events for downtown Santa Monica, visit www.downtownsm.com, follow their instagram @dtsantamonica and their blog santamonicacentric.com

1 Comment